tl;dr;
Let’s build a basic chat with Laravel Livewire and Echo. Users will be able to post messages and others will see them in real-time.
Installing all we need
Laravel Jetstream
To get an head-start on app scaffolding, user authentication, teams management I’m going to use Laravel Jetstream - Livewire flavor.
I’m using Laravel Herd on my machine, so I can create a Jetstream app from the UI:

I enabled team support since I want users to be able to create teams and invite other users to participate in chats within those teams.
Down the line it might be useful to enable email verification, but for now it can be disabled as the app will only run locally and I don’t want to spend time verifying test users emails.
As I’m using Laravel 11, the project will use SQLite as database. The installation process will take care of creating the database file and run the first set of migrations needed by Jetstream.
Laravel Reverb
When a user posts a message, all others will have to see it in real-time in their browser without refreshing the page. Duh.
This can be achieved thanks to real-time WebSocket communication provided by Reverb.
All its needed to get Reverb up and running is using the following command:
1php artisan install:broadcastingLaravel will set all default configuration which will be fine for this project.
Migrations, factories and seeders
At this stage I’ll keep the database structure as simple as possible. All I need is an extra table.
I can create the migration file with the command:
1php artisan make:migration create_messages_tableThis is the code to add to the created file:
1<?php 2 3use Illuminate\Database\Migrations\Migration; 4use Illuminate\Database\Schema\Blueprint; 5use Illuminate\Support\Facades\Schema; 6 7return new class extends Migration 8{ 9 /**10 * Run the migrations.11 */12 public function up(): void13 {14 Schema::create('messages', function (Blueprint $table) {15 $table->id();16 $table->foreignId('user_id')->constrained()->cascadeOnDelete();17 $table->foreignId('team_id')->constrained()->cascadeOnDelete();18 $table->text('content');19 $table->timestamps();20 });21 }22 23 /**24 * Reverse the migrations.25 */26 public function down(): void27 {28 Schema::dropIfExists('messages');29 }30};database/migrations/2024_04_11_124923_create_messages_table.php
The table represents messages within a chat.
A message belongs to a user, defined by the user_id foreign key.
A message is also associated with a team, identified by the team_id foreign key. This allows us to group messages together and facilitate chats on different topics, accessible only to users within that team.
And obviously the content of the message will be in the content field.
Now I can create the model for that migration:
1php artisan make:model Message 1class Message extends Model 2{ 3 use HasFactory; 4 5 protected $guarded = []; 6 7 public function user(): BelongsTo 8 { 9 return $this->belongsTo(User::class);10 }11}app/Models/Message.php
A message belongs to a user, that reflected in the user() relationship.
At this early stage of the project is the perfect time to take advantage of database seeder, so when I’ll open up the browser, I won’t have to face a sad empty chat.
First off I need a factory to create messages in bulk.
1php artisan make:factory MessageFactoryThe file will look like this:
1class MessageFactory extends Factory 2{ 3 /** 4 * Define the model's default state. 5 * 6 * @return array<string, mixed> 7 */ 8 public function definition(): array 9 {10 return [11 'user_id' => User::factory(),12 'team_id' => function (array $attributes) {13 return User::find($attributes['user_id'])->currentTeam->id;14 },15 'content' => $this->faker->sentence,16 ];17 }18}database/factories/MessageFactory.php
Each message will be a random “lorem ipsum” sentence. Not the best conversation to be part of, but it’s a start.
With the factory created is now time for the seeders.
Let’s start from UserSeeder:
1class UserSeeder extends Seeder 2{ 3 public function run(): void 4 { 5 $luca = User::factory()->withPersonalTeam()->create([ 6 'name' => 'luca', 8 'password' => Hash::make('123123123'), 9 ]);10 11 $viola = User::factory()->withPersonalTeam()->create([12 'name' => 'viola',14 'password' => Hash::make('123123123'),15 ]);16 17 $luca->currentTeam->users()->attach($viola, ['role' => 'admin']);18 $viola->switchTeam($luca->currentTeam);19 }20}database/seeders/UserSeeder.php
I want to create a couple users and make sure they both belong to the same team so they will be part of the same chat.
Next up MessageSeeder:
1class MessageSeeder extends Seeder 2{ 3 public function run(): void 4 { 5 Message::factory(10) 6 ->recycle(User::all()) 7 ->state(new Sequence( 8 fn (Sequence $sequence) => [ 9 'created_at' => Carbon::create(2024)->addMinutes($sequence->index * 5),10 'updated_at' => Carbon::create(2024)->addMinutes($sequence->index * 5)11 ],12 ))13 ->create();14 }15}database/seeders/MessageSeeder.php
The seeder creates 10 messages assigned randomly to one of the existing users with the recycle method.
Then we spread messages apart in time by using a sequence. Each message in the sequence will be 5 minutes after the previous one.
With both seeders ready I can now include them both in a single main seeder:
1class DatabaseSeeder extends Seeder2{3 public function run(): void4 {5 $this->call(UserSeeder::class);6 $this->call(MessageSeeder::class);7 }8}database/seeders/DatabaseSeeder.php
And run them with the artisan command:
1php artisan migrate:fresh --seedThe data is ready to go, so time to jump on application code side.
Display the data with Livewire
To keep it simple the Livewire component that will display the chat will be in the Dashboard page provided by Jetstream:
1<x-app-layout> 2 <x-slot name="header"> 3 <h2 class="font-semibold text-xl text-gray-800 leading-tight"> 4 {{ __('Dashboard') }} 5 </h2> 6 </x-slot> 7 8 <div class="py-12"> 9 <div class="max-w-7xl mx-auto sm:px-6 lg:px-8">10 <div class="bg-white overflow-hidden shadow-xl sm:rounded-lg">11 <livewire:chat />12 </div>13 </div>14 </div>15</x-app-layout>To create that component run the command:
1php artisan make:livewire chatThe output of the command will be 2 files:
resources/views/livewire/chat.blade.php
app/Livewire/Chat.php
Chat.php is responsible for fetching the data and passing it to the view. This can be done in the render() method:
1public function render() 2 { 3 $messages = Message::query() 4 ->where('team_id', auth()->user()->currentTeam->id) 5 ->with('user') 6 ->orderBy('created_at') 7 ->get(); 8 9 return view('livewire.chat')->with([10 'messages' => $messages,11 ]);12 }It retrieves all messages that belong to the team the user is currently in. Team features come with Jetstream and so it does the currentTeam relation defined on the user model.
The view chat.blade.php can now display those messages:
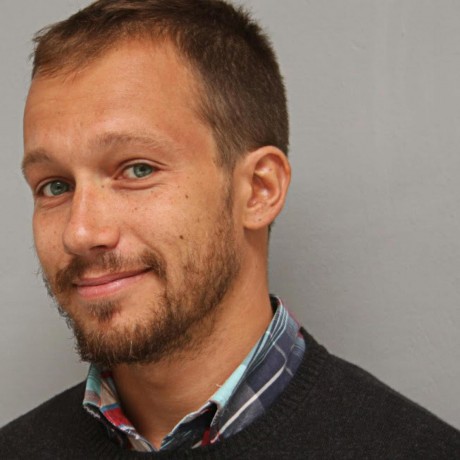
1<div> 2 <div class="divide-y"> 3 @foreach($messages as $message) 4 <div class="flex space-x-4 px-4 py-2"> 5 <div 6 class="flex-shrink-0 w-10 h-10 flex items-center justify-center text-lg font-semibold rounded-full bg-gray-200"> 7 {{ str($message->user->name)->upper()->limit(2, null) }} 8 </div> 9 <div>10 <div class="flex space-x-4 items-center">11 <div class="font-semibold">{{ $message->user->name }}</div>12 <div class="text-sm">{{ $message->created_at }}</div>13 </div>14 <div>{{ $message->content }}</div>15 </div>16 </div>17 @endforeach18 </div>19</div>resources/views/livewire/chat.blade.php
This the result in the browser:
To be a chat, that page now needs a way to allow the user to post new messages.
We can start from the backend by changing Chat.php.
1class Chat extends Component 2{ 3 public string $message = ''; 4 5 public function send() 6 { 7 Message::create([ 8 'user_id' => auth()->id(), 9 'team_id' => auth()->user()->currentTeam->id,10 'content' => $this->message,11 ]);12 13 $this->reset();14 }15 16 public function render()17 {18 ...19 }20}app/Livewire/Chat.php
The new public field $message will contain the content of the message. Will be available in the view for the user to edit.
Once the user will post the message the send() method will be triggered to save the message in the database and reset the form (which will empty out the textarea where the user typed the message).
Again, to keep it simple for now I didn’t bother adding any validation or authorization before saving data in the database.
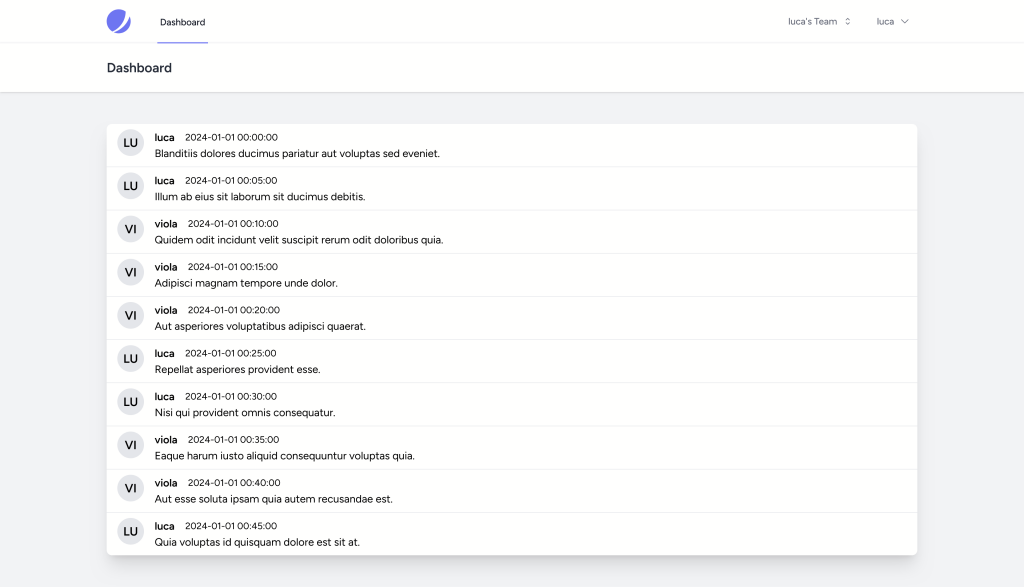
Now it’s possible to use the new field and method in the view:
1<div> 2 <div class="divide-y"> 3 ... 4 </div> 5 <div class="p-4"> 6 <div class="flex items-start space-x-4"> 7 <div class="min-w-0 flex-1"> 8 <form wire:submit="send" class="relative"> 9 <div class="overflow-hidden rounded-lg shadow-sm ring-1 ring-inset ring-gray-300 focus-within:ring-2 focus-within:ring-indigo-600">10 <label for="comment" class="sr-only">Send a message</label>11 <textarea wire:model="message" rows="3" name="message" id="message" class="block w-full resize-none border-0 bg-transparent py-1.5 text-gray-900 placeholder:text-gray-400 focus:ring-0 sm:text-sm sm:leading-6" placeholder="Send a message..."></textarea>12 13 <div class="py-2" aria-hidden="true">14 <div class="py-px">15 <div class="h-9"></div>16 </div>17 </div>18 </div>19 20 <div class="absolute inset-x-0 bottom-0 flex justify-between py-2 pl-3 pr-2">21 <div class="flex-shrink-0">22 <button type="submit" class="inline-flex items-center rounded-md bg-indigo-600 px-3 py-2 text-sm font-semibold text-white shadow-sm hover:bg-indigo-500 focus-visible:outline focus-visible:outline-2 focus-visible:outline-offset-2 focus-visible:outline-indigo-600">Post</button>23 </div>24 </div>25 </form>26 </div>27 </div>28 </div>29</div>resources/views/livewire/chat.blade.php
The textarea is bound to the $message field by using the attribute wire:model="message".
When the form is submitted we can call the send() method with wire:submit="send".
This is now enough to see the chat working. You can try sending a message and will show up right away in your browser thanks to Livewire.
But if another user has the same chat open and a new message is created, will not be able to see it unless a page refresh is done. Let fix this.
Make it real-time with Laravel Echo
When a new message is created, I want an event to be raised and sent to all users with the chat open. This event will result in Livewire re-rendering the chat component to display the new message.
We can start from adding an observer to raise the event when a message model is created:
1php artisan make:observer MessageObserverThen add the logic in the file:
1class MessageObserver 2{ 3 /** 4 * Handle the Message "created" event. 5 */ 6 public function created(Message $message): void 7 { 8 broadcast(new MessageSent($message))->toOthers(); 9 }10}app/Observers/MessageObserver.php
Note how the message is broadcasted only to others, not to the user sending the message. Livewire will already take care of refreshing the list of messages for that user. No need to receive another event.
And connect it to the model:
1#[ObservedBy(MessageObserver::class)]2class Message extends Model3{4 ...5}app/Models/Message.php
Next let’s create the MessageSent event.
1php artisan make:event MessageSent 1class MessageSent implements ShouldBroadcast 2{ 3 use Dispatchable, InteractsWithSockets, SerializesModels; 4 5 public function __construct( 6 public Message $message 7 ) 8 { 9 //10 }11 12 public function broadcastOn(): array13 {14 return [15 new PrivateChannel('chat.' . $this->message->team_id),16 ];17 }18}The message will be broadcasted on a private channel: only users on the specific team will be able to listen to it.
For this reason the name of the channel will be chat.<team-id>.
Later on in the project this channel name will be changed as a team will include multiple group chats, similarly to Slack channels.
Now the last changes needed on Chat.php:
1class Chat extends Component 2{ 3 ... 4 5 public function getListeners() 6 { 7 $teamId = Auth::user()->currentTeam->id; 8 9 return [10 "echo-private:chat.{$teamId},MessageSent" => 'received',11 ];12 }13 14 public function received($event)15 {16 //do nothing, just to trigger a re-render17 }18 19 ...20}app/Livewire/Chat.php
We can listen to the MessageSent event by implementing the getListeners() method and assign the method received() to the event. This method does nothing, but calling it will force the render() method to run, which in turn will pull the latest messages from the database.
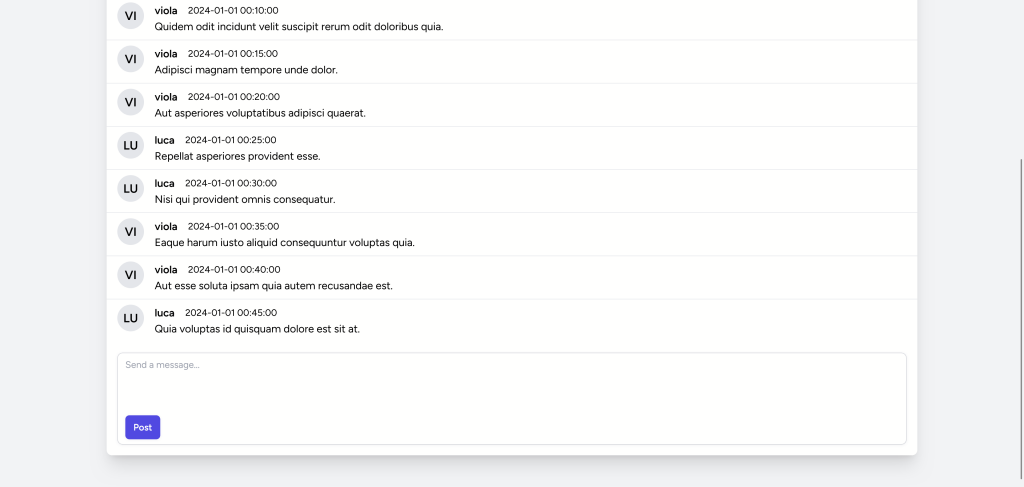
Note: to verify that the broadcasted event is not received by the user raising it, it’s possible to add a dump() method in received():
1public function received($event)2{3 dump(Auth::user()->name . ' received the message: ' . $event['message']['content']);4}With two browser windows open side by side, each for a different user it’s possible to see how the dump() message is visible only for one user.
When a message is sent, the Laravel Herd dump viewer will only display a single message.
This is all for now. The next step will be creating channels within teams. So users will be able to have separate chats about different topics.